
Repairing and Replacing Electrical Outlets
Replacing or upgrading electrical outlets enhances safety, functionality, and code compliance in a home. Careful attention to wiring, power shutoff, and proper outlet selection helps prevent hazards.
Removing and Installing a Standard Outlet
Before starting, turn off the power at the circuit breaker and confirm with a voltage tester that the outlet is not live. Unscrew the wall plate and the old outlet, gently pulling it out to expose the wiring.
Identify each wire: the black or red is the hot wire, the white is the neutral wire, and the bare copper or green is the ground wire. Take note of where each wire connects, as the new receptacle should match the same configuration.
If the ends of wires are frayed or too short, trim and strip them to ensure a snug fit. Attach wires to the correct terminals on the new standard outlet—hot to the brass screw, neutral to the silver screw, and ground to the green screw.
For extra safety, wrap electrical tape around the outlet body to cover screw terminals, as suggested by Home Depot. Carefully push the outlet back into the box, screw it in, and reattach the wall plate.
Restore power and test.
Upgrading to a GFCI Outlet
A GFCI (Ground Fault Circuit Interrupter) outlet is required in damp or potentially wet areas such as kitchens, bathrooms, and garages. Start by shutting off the power to the area and verifying with a voltage tester.
After removing the old outlet, identify the line and load terminals on the GFCI receptacle. The line terminals connect to the incoming power (hot and neutral), while load terminals protect downstream outlets.
Carefully connect the black hot wire and white neutral wire to their respective terminals, and attach the bare copper ground wire to the green ground screw. Test the GFCI reset and test buttons before use.
If wiring for multiple protected outlets, only connect additional wires to the load terminal if you want downstream protection. Installing a GFCI enhances electrical safety by quickly disconnecting power during faults.
Wiring New Receptacles
When installing a new electrical outlet, ensure the power is off and use the correct gauge copper wire for the circuit—typically 12 or 14 gauge. Run the new wire (black hot, white neutral, and bare copper ground) from the breaker panel or existing outlet, stapling it securely to wall studs.
At the new electrical box, strip insulation and connect the wires: hot to brass, neutral to silver, and ground to green. Use wire nuts for splices and wrap connections with electrical tape.
Mount the receptacle in the box and install the wall plate. Always check the new receptacle with an outlet tester after restoring power to confirm correct polarity and grounding.
Fixing Switch Issues and Replacing Wall Switches
Electrical switches commonly fail due to loose connections, worn-out components, or damage from overloaded circuits. DIYers can often address these problems by safely inspecting, diagnosing, and replacing switches or switch plates with a few basic tools.
Identifying Common Switch Problems
Light switches that fail to operate may have several causes. Signs of trouble include flickering lights, switches that feel loose or wobbly, or outlets and appliances that only work intermittently.
In some cases, homeowners notice buzzing noises or a slight burning smell, which can indicate faulty wiring or a failing switch mechanism. The troubleshooting process should begin by making sure the power is turned off at the circuit breaker.
After that, checking for loose wires—often a prime cause of intermittent problems—can help determine whether a simple adjustment or full replacement is necessary. If the switch doesn’t click or feels warm to the touch, it’s typically time for replacement.
For more detailed diagnostic steps, see how the pros diagnose a light switch that doesn’t work.
Replacing a Light Switch
After confirming the need for replacement, gather a screwdriver, voltage tester, and a new switch of the same type. Clearly label the wires or take a photo before disconnecting anything.
Remove the switch plate and unscrew the old switch from the electrical box. Carefully disconnect each wire, noting their positions—most light switches have three wires attached.
Secure each conductor under the terminals of the new switch, matching the previous configuration. Once all wires are attached and tightened, screw the new switch back into the box.
Restore power at the breaker and test the switch function. If needed, refer to an illustrated step-by-step on replacing a light switch.
Switch Plate Installation and Safety
Install the switch plate by aligning it over the switch and securing it with the provided screws. Avoid overtightening to prevent cracking the cover.
All metal parts of the switch box should be completely enclosed by the plate to reduce the risk of electrical shock. Always confirm the power is off before any installation or maintenance.
Use a non-contact voltage tester to verify there’s no current present. Ensuring the switch plate is flush with the wall will help prevent exposed wiring and make the outlet or switch safer for everyday operation.
Regular checks for loose connections and safety issues can help maintain reliable performance over time.
Diagnosing and Repairing Light Fixture Problems
When a light fixture stops functioning properly, the issue often relates to flickering bulbs, outdated components, or faulty wiring. Proper diagnosis and repair improve safety and restore optimal lighting in any space.
Careful troubleshooting helps prevent hazards and extends the lifespan of electrical components.
Dealing with Flickering Lights
Flickering lights can be both annoying and a sign of underlying electrical problems. The most common causes include loose bulb connections, worn-out lamp sockets, or incompatible dimmer switches.
Homeowners should first ensure the bulb is tightly secured and compatible with the fixture. If flickering continues, the next step is to turn off the power and inspect the socket contacts for signs of wear or corrosion.
Cleaning or gently bending the metal tab within the socket can restore a secure connection. Persistent flickering may indicate an issue with the switch or with the wiring, requiring further inspection or professional help.
Important checklist for flickering lights:
- Ensure the bulb fits properly.
- Examine for corroded sockets.
- Test fixtures with a different bulb.
- Check for loose wiring at the fixture or wall switch.
More details on these steps can be found in this guide to troubleshooting light fixture problems.
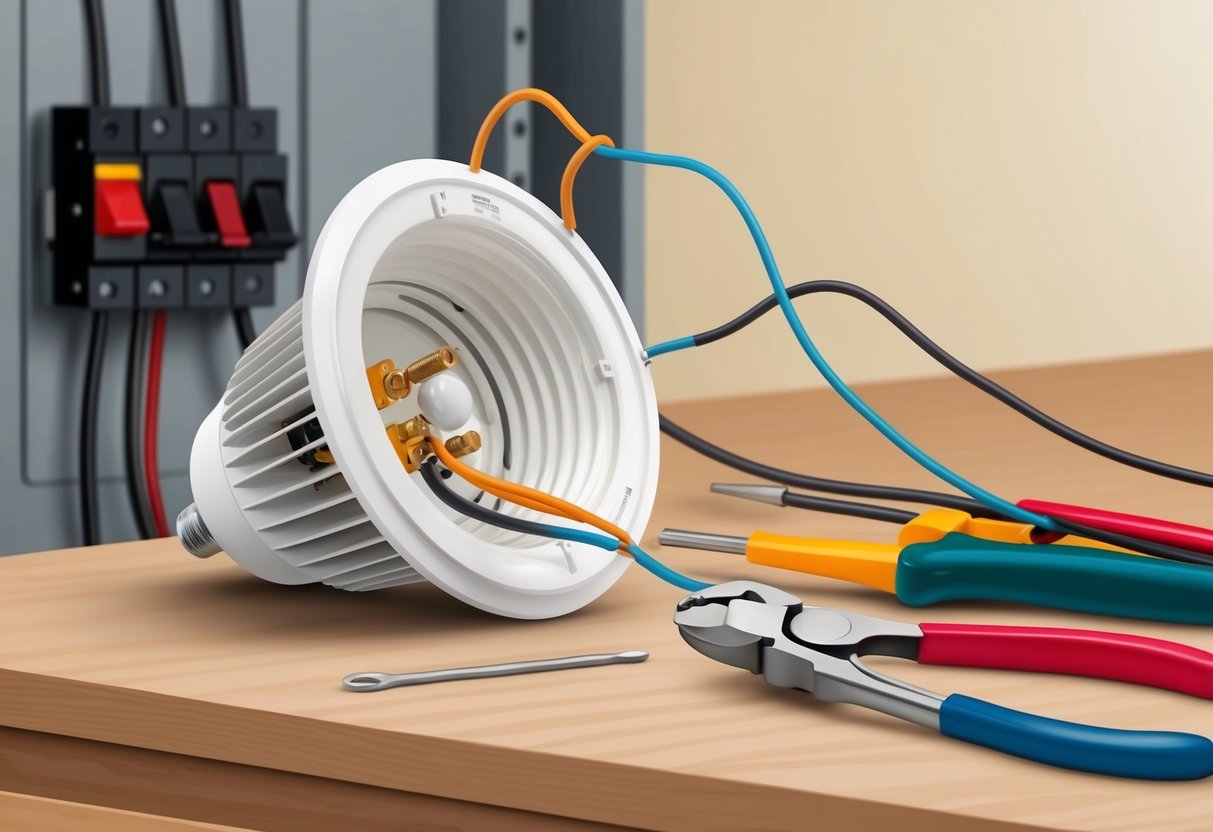
Replacing Faulty or Outdated Light Fixtures
Old or malfunctioning fixtures often cause issues like flickering, buzzing, or no light at all. If cleaning contacts and tightening bulbs does not resolve the issue, replacement may be the safest choice.
Outdated fixtures can also lack modern safety features or efficient electrical components. To replace a light fixture, always turn off power at the circuit breaker.
Remove the old fixture by disconnecting wires and unscrewing mounting hardware. When wiring the new fixture, carefully match wire colors and use secure wire connectors.
Mount the new fixture firmly before turning power back on. Broken or discolored fixtures should be discarded, as these signs indicate heat damage or compromised wiring.
Upgrading outdated fixtures can significantly reduce fire risk and improve energy efficiency, especially when paired with modern LED bulbs.
Identifying Wiring Issues in Light Fixtures
Wiring problems are a primary cause of repeated light fixture failure or intermittent function. Symptoms include flickering lights, humming, or electrical shocks when touching switches.
These issues stem from loose connections, damaged wiring insulation, or failed electrical components inside the fixture. A systematic approach helps pinpoint faulty wiring.
After turning off power, inspect each wire connection for looseness or visible damage. Discoloration, exposed copper, or melted insulation is a red flag.
Using a voltage tester can confirm if power is reaching the fixture. If wiring issues are found that can’t be safely fixed, call a licensed electrician to avoid shock or fire hazards.
Electricians often use methods such as beginning at the power source and isolating each segment in a process sometimes known as “divide and conquer.” This targeted approach efficiently finds and resolves wiring faults, as described in more detail by professionals skilled in troubleshooting and fixing light fixture problems.